
Note: This post was revised slightly on March 21, 2017 to remove reference to out-of-band (oob) configuration, which is not currently supported for getRequestToken call.
——–
The OAuth protocol enables websites or applications (Consumers) to access Protected Resources from a web service (Service Provider) via an API, without requiring Users to disclose their Service Provider credentials to the Consumers. OAuth can be a complex phenomenon to understand especially when you have to open its guts for troubleshooting when issues arise. Here at Intuit we currently support the 3-legged OAuth 1.0a standard. OAuth 1.0a was designed to enable communication over any channel including email where the security of any parameters and intermediate steps could not be trusted. Consequently, OAuth 1.0 requires a fair bit of cryptography as we will see in this post. OAuth 2.0 is designed to be used exclusively in an SSL environment. OAuth 2.0 is something that Intuit is working on supporting in the future as the de facto OAuth version.
There are lots of third-party libraries in all programming languages that abstract the OAuth code implementation from the business logic. However, in our experience, there are times where you as a developer need to dig deeper into the OAuth standard and the code for it to debug issues that could arise due to a number of reasons. Since OAuth 1.0 is fairly convoluted in its operation at the core level with many intricate atomic steps and cryptographic operations, most developers get stalled at this point and that is precisely the motivation behind this blog post.
Whom is this blog post for?
This blog post is for a specific segment of developers whose aim is either of the following:
- Gain conceptual clarity on 3-legged OAuth and the purpose of each leg: If you are a developer who is already using a third party OAuth helper library then you should skim over the finer technical details of this blog post and just use this post to validate and build a higher level understanding of OAuth. For new developers our recommendation is that they should use this blog post to build a broader level of knowledge of the steps involved and then they should look at a third party OAuth library for the actual implementation. The reason is that the abstraction of the low level details is what the OAuth helper libraries are designed to do.
- Want to implement manual OAuth calls: If you’re a developer who already does or is planning to do manual OAuth implementation (due to reasons like the inability to use OAuth libraries with your codebase due to incompatibilities) then the fine-grained details in this post should greatly help you. One of the most common issues in manual OAuth implementation is getting the ‘signature_invalid’ error while trying to generate the OAuth signature. If that’s you then look no further and this blog post is surely for you.
The Intuit Developer team provides SDKs for .NET, Java, and PHP that make it easier for your app to call QuickBooks Online. We use the following OAuth libraries in those SDKs:
- JAVA: Signpost
- .NET: DevDefined.OAuth
Terminology
Let’s first talk about some of the terms that we will use during the length of this blog post. This is also terminology that you should understand at a fundamental level if you want to build applications on top of the Intuit QuickBooks platform using the OAuth 1.0a protocol.
Service Provider: A web application that allows access via OAuth. Intuit is an example of a Service Provider.
User: An individual who has an account with the Service Provider.
Consumer: A website or application that uses OAuth to access the Service Provider on behalf of the User. We will use the term, App, in this post to imply the Consumer.
Request Token: A value used by the App to obtain authorization from the User and to exchange for an Access Token.
Request Token Secret: A secret used by the App to establish ownership of the request token.
Access Token: A value used by the app to gain access to the Protected Resources on behalf of the User instead of using the User’s Intuit credentials.
Access Token Secret: A secret used by the App to establish ownership of the access token. It is also used to sign requests made with that Access Token.
Consumer Key and Consumer Secret — These are private keys generated when you create an app. To find and copy these keys, sign in to developer.intuit.com and click My Apps. Find and open the app you want and click the Keys tab.
For illustration purposes let’s say that our:
oauth_consumer_key=ckckckck
oauth_consumer_secret=cscscs
Request token URL: The REST URL that is used to get a request token.
Intuit’s Request token URL is https://oauth.intuit.com/oauth/v1/get_request_token.
Access Token URL: The REST URL that is used to get an access token
Intuit’s Access token URL is https://oauth.intuit.com/oauth/v1/get_access_token.
User Authorization URL: This is the URL to which you need to send the user, with your request token to authorize the connection. Upon authorization Intuit will redirect back to you with a token verifier which can then be exchanged to get an Access Token.
Intuit’s User Authorization URL is https://appcenter.intuit.com/Connect/Begin.
OAuth Callback: The URL implemented by your app to which Intuit redirects right after user authorization flow (along with oauth_token and oauth_verifier) and right before the access token retrieval step.
OAuth Nonce: A nonce is a random string uniquely generated for each request. The nonce allows Intuit to verify that a request has never been made before and helps prevent replay attacks when requests are made over a non-secure channel (such as HTTP).
Timestamp: This is the timestamp when the request was created. As per the OAuth 1.0a reference documentation and unless otherwise specified by the Service Provider, the timestamp is expressed in the number of seconds since January 1, 1970 00:00:00 GMT. The timestamp value MUST be a positive integer and MUST be equal or greater than the timestamp used in previous requests.
Version: The oauth_version parameter should always be 1.0 for any request sent to the Intuit.
RealmId: The realmId, also known as the Company ID, uniquely identifies the data for a company. In QuickBooks Online, the Company ID appears on the My Account page.
OAuth Token (oauth_token): The Request Token the User authorized or denied. So the oauth_token value is the same as request_token. (Oauth token is a generic term that can have either the request token value or the access token depending on which leg of the Oauth flow this parameter is used)
Verifier (oauth_verifier) : A verification code generated by Intuit that an App is supposed to pass back during the get_access_token step.
Signature: The oauth_signature parameter contains a unique value that is generated by processing the actual HTTP request components being sent along with the request parameters and two secret values through a signing algorithm. The purpose of the signature is so that Intuit can verify that the request has not been modified in transit, verify the application sending the request, and verify that the application has authorization to interact with the user’s account. One important thing to remember is that if the oauth_signature parameter is being passed in ways other than in the HTTP Authorization header, it needs to be URL encoded (because it can have special characters like + and = which are perfectly valid)
Signature method: OAuth does not mandate a particular signature method, as each implementation can have its own unique requirements. The protocol defines three signature methods: HMAC-SHA1, RSA-SHA1, and PLAINTEXT, but Intuit supports HMAC-SHA1. This algorithm must be used when generating the oauth_signature value.
Signature base string: The signature base string is a value that’s comprised of:
1. The HTTP verb (GET, POST, PUT, DELETE etc.)
2. The URL being called
3. The request parameters being passed into the URL. It’s very important to note here that parameters are sorted by name. If two or more parameters share the same name, they are sorted by their value.
Here’s the method to encode all these values to construct the base string:
1. Convert the HTTP Method to uppercase and set the output string equal to this value.
2. Append the ampersand (&) character to the string.
3. Percent encode the URL and append it to the string.
4. Append the ampersand (&) character to the string.
5. Percent encode the parameter string and append it to the string.
Signing Key: In case of the HMAC-SHA1 cryptographic hash function algorithm, the signing key is a piece of information (a parameter) that determines the functional output of the cryptographic algorithm.
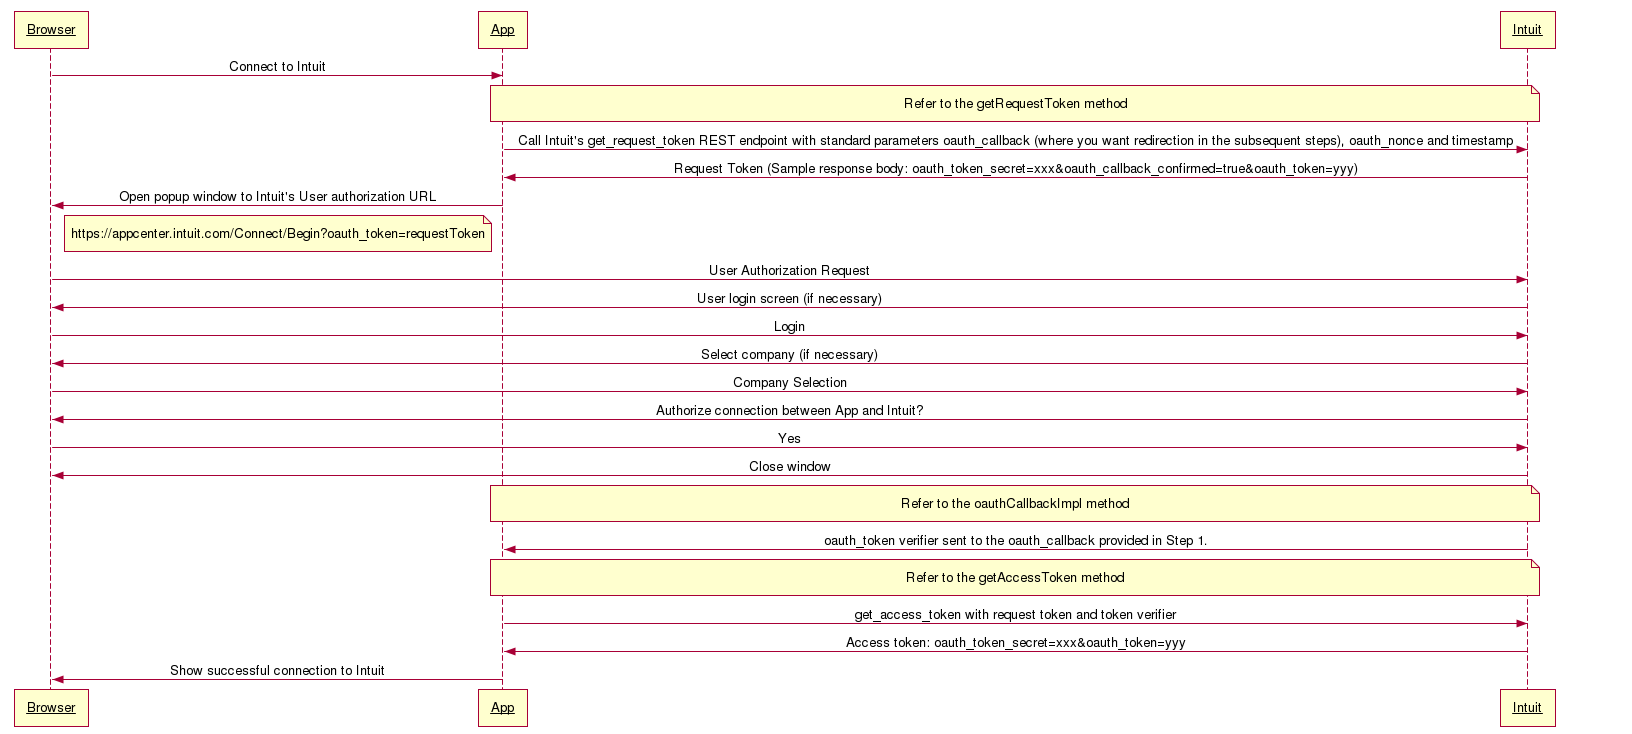
The 3-legged flow
Leg-1: Get Request Token
This server-server call lets your app retrieve the Request Token and Request Token Secret from Intuit’s OAuth gateway.
HTTP Request details
Basically your app needs to issue a GET request to the Intuit’s Request token URL, which is https://oauth.intuit.com/oauth/v1/get_request_token, along with the following parameters. (Because they are query strings their ordered doesn’t matter. However, we will see below when their order DOES matter):
oauth_callback
oauth_consumer_key
oauth_nonce
oauth_signature_method
oauth_timestamp
oauth_version
oauth_signature
In other words, the HTTP request would have the structure:
GET https://oauth.intuit.com/oauth/v1/get_request_token?oauth_callback=xxx&oauth_consumer_key=ckckck………
How to compute the signature
This is usually the hairiest part of the OAuth request construction process. Follow these steps:
a. Constructing the Signature Base String: Following the steps as described in the definition of the base string above, a sample base string before it’s percent encodes looks like(remember the parameters are sorted by their name):
GET&https://oauth.intuit.com/oauth/v1/get_request_token&oauth_callback=
http%3A%2F%2Flocalhost%3A9000%2FoauthCallbackImpl&oauth_consumer_key=ckckck&oauth_nonce=<nonce_value>&oauth_signature_method=HMAC-SHA1&oauth_timestamp=<timestamp_value>&oauth_version=1.0
And after we percent-encode it we get the actual signature base string that looks like:
GET&https%3A%2F%2Foauth.intuit.com%2Foauth%2Fv1%2Fget_request_token&oauth_callback%3D
http%253A%252F%252Flocalhost%253A9000%252FoauthCallbackImpl%26
oauth_consumer_key%3Dqyprd65wBgNHyLYdB7CAzT13AeDMJb%26oauth_nonce%3D<nonce_value>%26oauth_signature_method%3DHMAC-SHA1%26oauth_timestamp%3D<timestamp_value>%26oauth_version%3D1.0
b. Assembling the signing key: As per the OAuth protocol, the signing key is the concatenated values of the Consumer Secret and Token Secret, separated by an & character (ASCII code 38) even if empty.
So in this case, since there is no Token Secret, our signing key becomes:
cscscs&
c. Calculating the signature: Finally, the signature is calculated by passing the signature base string and signing key to the HMAC-SHA1 hashing algorithm. There are HMAC-SHA1 helper functions in most programming languages so all you have to do is just invoke that helper function with these values.
There is still one last step that needs to happen. The output of the HMAC SHA1 cryptographic function is a binary value and this needs to be base64 converted in order to get a
digest
value which will be our signature. Here’s an example of a sample signature (note that + and = symbols are valid characters in a signature but need to be URL encoded because the signature parameter is being passed in the URL):
GcVWVe2TI31L3S9TMCfFwcsZkLQ%3D
HTTP Response details
If your request is well formed and correct, you receive a HTTP 200 OK response code with the following body:
oauth_token_secret=UjCAwBvWUNTNXbv0CmrKtMCDqY3FB9H14uVzpWgt&oauth_callback_confirmed=true
&oauth_token=qyprdfsUSSKkHAwQ0bJkxeT4Ao6f2gwniXAFzDMFjdXFCqy2
The oauth_token and oauth_token_secret parameters represent the Request Token and Request Token Secret respectively.
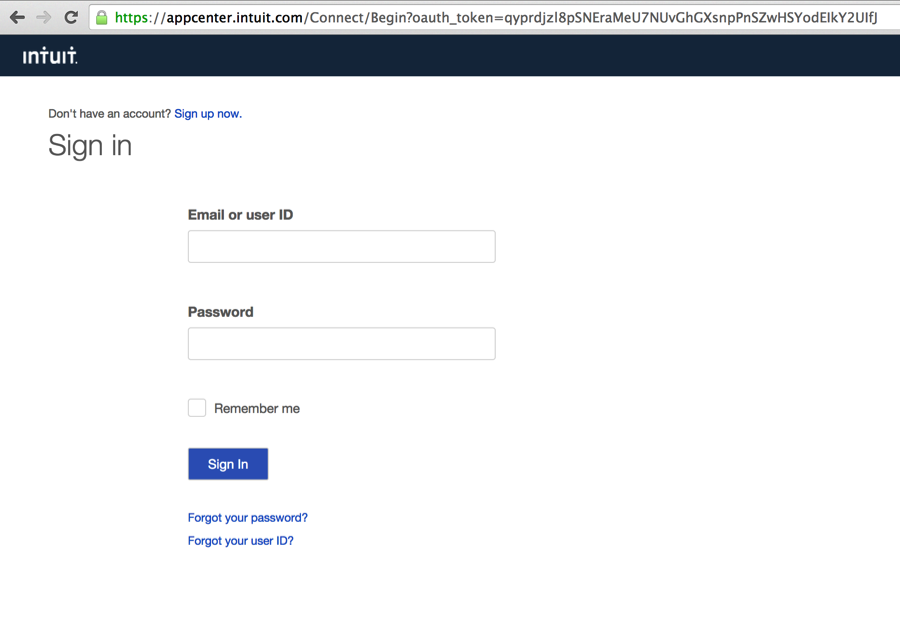
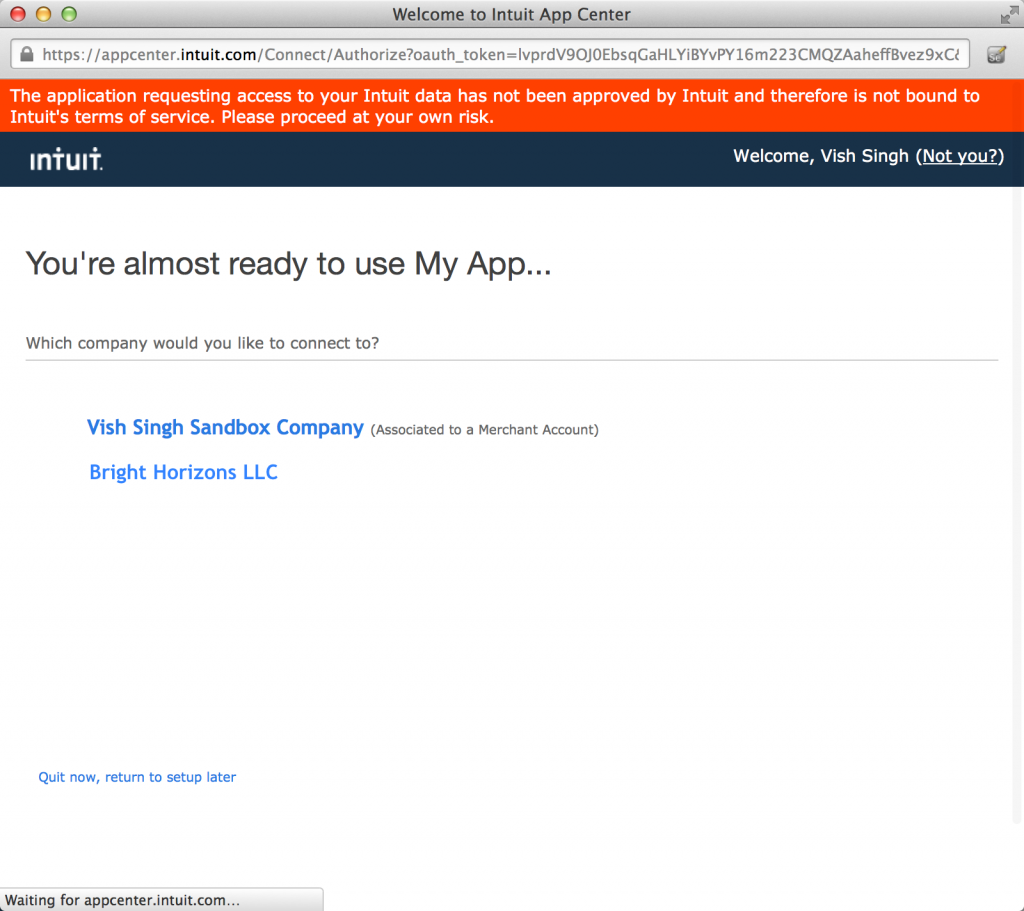
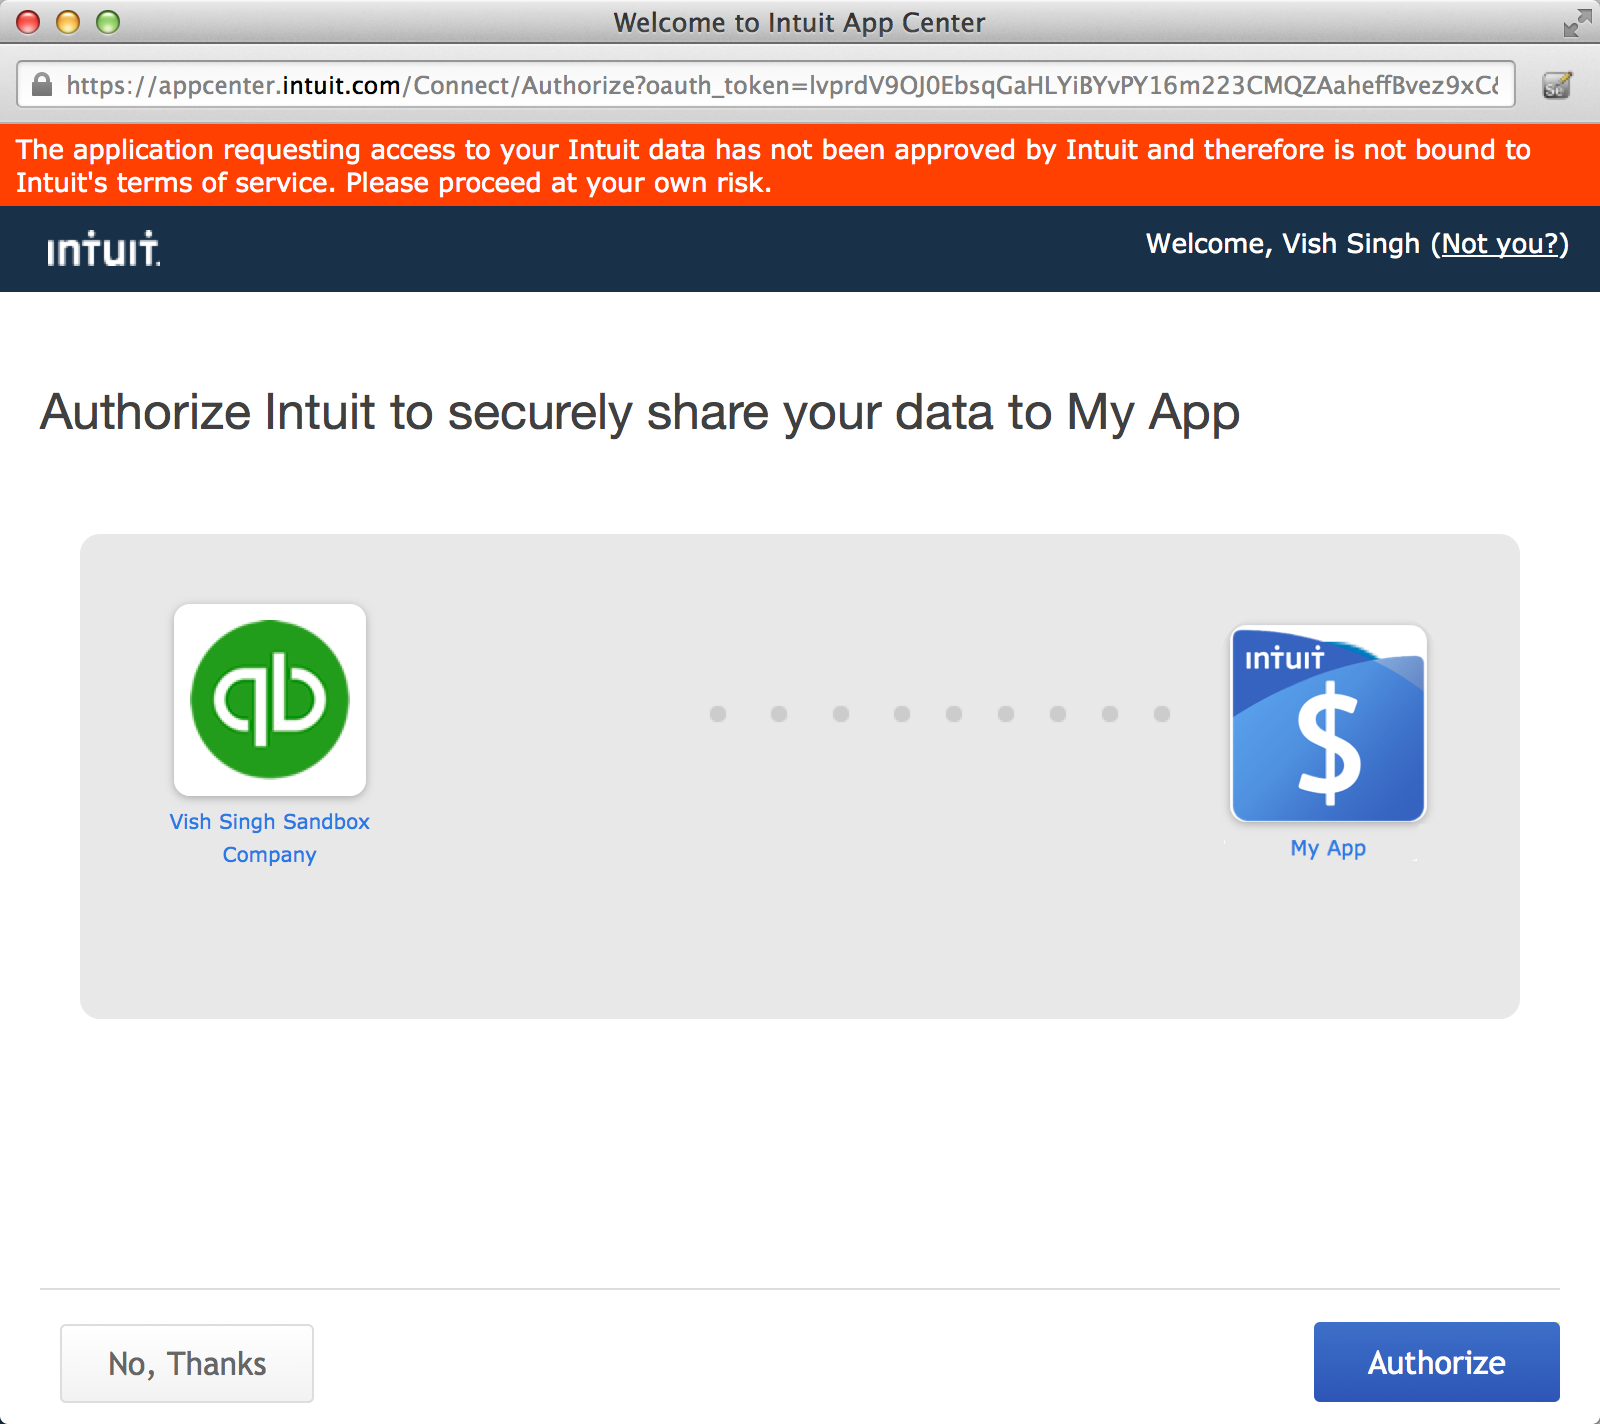
User Authorization Step:
This step is about getting the Request Token authorized by the user so that the Request Token can be used further in the OAuth flow to ultimately be exchanged for an Access Token. If this user authorization doesn’t happen or if the user chooses to deny authorization to the Request Token, the Service Provider will not honor the Request Token anymore. After getting the Request Token, the App opens a popup window to the Intuit’s User Authorization URL passing in the Request Token as a parameter. So in pseudocode:
OpenPopup(“https://appcenter.intuit.com/Connect/Begin?oauth_token=
<request_token>”);
This will start the user login and authorization flow. The following steps happen in sequence as a part of this step:
-
- The user is asked to log in.
2. The user is asked pick a realm (company) whose data they want to authorize access to:
3. And finally an Authorize screen to enable the authorization:
Leg-2: Get OAuth Token and a Verifier
Once the user clicks on the Authorize button in the previous step, Intuit automatically redirects to the oauth_callback URL along with three values: oauth_token (which is the same as Request Token being authorized or denied), oauth_verifier and realmId.
Leg-3: Get Access Token
This server-server call lets your app retrieve the Access Token and Access Token Secret from Intuit’s OAuth REST gateway. The Request Token and Token Secret MUST be exchanged for an Access Token and Token Secret. A point to note is that Intuit’s Access keys are valid for 6 months (180 days).
HTTP Request details
Basically your app needs to issue a GET request to the Intuit’s Access token URL which is:
https://oauth.intuit.com/oauth/v1/get_access_token
along with the following parameters (because they are query strings, their ordered doesn’t matter. However we will see below when their order DOES matter):
oauth_consumer_key
oauth_nonce
oauth_signature_method
oauth_timestamp
oauth_token
oauth_verifier
oauth_version
oauth_signature
In other words, the HTTP request would have the structure:
GET https://oauth.intuit.com/oauth/v1/get_access_token?oauth_consumer_key=ckckck&oauth_nonce=XXXX……….
How to compute the signature
a. Constructing the Signature Base String: Following the steps as described in the definition of the base string above, a sample base string before it’s percent encodes looks like (remember the parameters are sorted by their name):
GET&https://oauth.intuit.com/oauth/v1/get_access_token&oauth_consumer_key=ckckck&oauth_nonce=<nonce_value>&oauth_signature_method=HMAC-SHA1&oauth_timestamp=<timestamp_value>&oauth_token=<oauth_token_value>&oauth_verifier=<oauth_verifier_value>&oauth_version=1.0
And after we percent-encode it we get the actual signature base string that looks like:
GET&https%3A%2F%2Foauth.intuit.com%2Foauth%2Fv1%2Fget_access_token&oauth_consumer_key%3Dckckck
%26oauth_nonce%3D<nonce_value>%26oauth_signature_method%3DHMAC-SHA1%26oauth_timestamp%3D <timestamp_value>%26oauth_token%3D<oauth_token_value>
%26oauth_verifier%3D<oauth_verifier_value>%26oauth_version%3D1.0
b. Assembling the signing key: Since the signing key is the concatenated values of the Consumer Secret and Token Secret, separated by an & character (ASCII code 38) even if empty, so in this case, our signing key becomes:
cscscs&UjCAwBvWUNTNXbv0CmrKtMCDqY3FB9H14uVzpWgt
c. Calculating the signature: The signature generation process is the same as previous step.
HTTP Response details
If your request was well formed and correct, you should see a HTTP 200 OK response code with the following body:
oauth_token_secret=0t6olEXdZUVrAO9x4j0bPe8pEdFbPr8oCuGb1s61&oauth_token=
qyprd8thPpv4KESvaMDJOiH3k9QOX1fJQBlHRMEJg8w4HnnS
The oauth_token and oauth_token_secret variables represent the Access Token and Access Token Secret respectively.
The following table describes which OAuth parameters are required for each type of OAuth request:
Parameter |
Request Token |
Access Token |
Endpoint |
| oauth_callback | X | ||
| oauth_consumer_key | X | X | X |
| oauth_nonce | X | X | X |
| oauth_signature | X | X | X |
| oauth_signature_method | X | X | X |
| oauth_timestamp | X | X | X |
| oauth_token | X | X | |
| oauth_verifier | X | ||
| oauth_version | X | X | X |
| scope | X |
(Source: https://developer.concur.com/api-documentation/drafts-internal/deprecated-features/implementing-and-troubleshooting-oauth)
Also, here’s a sequence diagram illustrating the OAuth process:
Make your first call to QuickBooks APIs
Once you retrieve the Access Token and Access Token Secret, you are equipped with the power to call QuickBooks APIs (Accounting and Payments Beta APIs) and access the User’s data on their behalf. Please visit the Intuit Developer portal and our developer docs for more information on QuickBooks API offerings, syntactic and semantic details of the data model that these APIs support, developer tools that will help you bootstrap your application in minutes and sample applications that can teach you conventions, concepts and code components and hence greatly set you up for success.
Leave a Reply